jackyko1991.github.io Biomedical Image Computation 101
CMake Introduction
CMake is a cross-platform open-source software for C++ dependency management. The software generate adequate build system according to different compilers and OS. It supports hierarchial folder structures and multiple third party libraries. The software is used in conjunction with native build environments such as Make, Qt Creator, Ninja, Android Studio, Apple’s Xcode, and Microsoft Visual Studio. In short, CMake could generate compiler and workspace specific C/C++ build system with a single CMakeLists.txt file.
Hello World
The following source code files (assumed to be put into src/ folder) demonstrate compilation of basic hello world program called hello written in C++.
// src/Hello_world.cc
#include <iostream>

int main()
{
    std::cout << "Hello, world!\n";
}
# src/CMakeLists.txt
cmake_minimum_required(VERSION 3.10)

# set the project name
project("Hello World")

# executable to compile
add_executable(hello "Hello_world.cc")
In order for CMake to work you have to run the following bash script (placed next to the src/ folder assuming that you are working under Linux-based OS and have all necessary dependencies installed):
#!/usr/bin/env bash
# Place this file next to src/ folder
cmake -S src/ -B build/ # Generates building files into build/ folder
cmake --build build/    # Actually builds executable
build/hello             # => Hello, world! - output from compiled program
For a detailed tutorial of CMakeLists.txt, refers to derekmolloy.ie: http://derekmolloy.ie/hello-world-introductions-to-cmake/.
CMake Basic Workflow
- Edit
CMakeLists.txt: CMake will configure the build system with user providedCMakeLists.txt. - Generate Build Dependencies: CMake will generate necessary build files according to different platforms and compilers (-G
). For example you may choose to output `Makefile` under Linux/Unix/MinGW , `*.sln` with MSVC in Windows, or `*.xcodeproj` with XCode in MacOS.
Different Interfaces of CMake Build
CMake comes with 3 different binaries for different interface build:
cmake: Command line interface.cmake-gui: Graphical user interface of cmake.ccmake: Console equivalent ofcmake-gui. Not available in Windows distribution.
The three software can cross use after configuration. i.e. You may use cmake method to generate the initial build configuration files, then edit the dependencies with cmake-gui or ccmake interface for convenience.
Command Line (cmake)
To configure and generate CMake build system under command line mode, type the following command in Terminal:
cmake <src_dir> --build <build_dir> -G <generator>
<src_dir>refers to the folder containing rootCMakeList.txtfile.<build_dir>specifies the binary build directory.<generator>specifies the build system to be used, e.g."Visual Studio 14 2015 Win64","Unix Makefiles"
Another commonly used CLI method for Linux/Unix system:
cd <src_dir>    # move to source code directory
mkdir build     # create build directory
cd build        # move into build directory
cmake ..        # run cmake configuration and generation build files
make            # compile the code
install         # install the build files (optional)
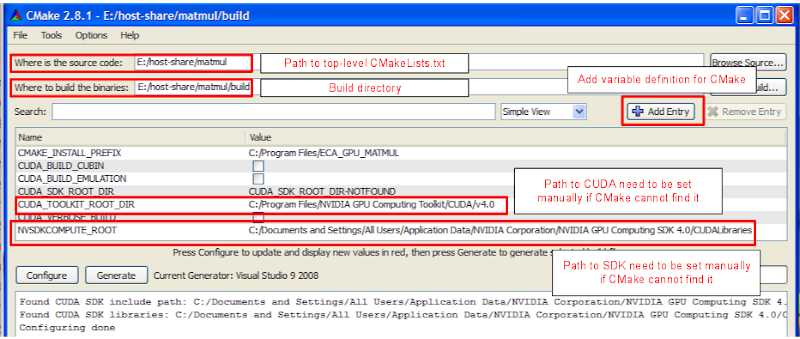
Graphical User Interface (cmake-gui)
-
Double click on
cmake-gui
- Similar to
cmake, you need to provide source code location and desired build directory. - Click
Configure
- Similar to
-
Choose the generator that suitable for your compiler

-
After the initial configure step, the GUI will show you a list of cache variables, similar to the list you see when you run
cmake -L -Nfrom the command line.
New cache variables are highlighted in red. (In this case, that’s all of them.) If you click
Configureagain, the red highlights will disappear, since the variables are no longer considered new.Change the variables when necessary. This step is usually essential for projects that depends on third party libraries.
Once you’ve customized the cache variables, click
Generate. This will generate the build pipeline in the binary folder. You can then use it to build your project.
Console GUI (ccmake)
ccmake is the console equivalent to cmake-gui. Like the GUI, it lets you set cache variables interactively. When CLI is handy to manage cmake configurations or running CMake in remote machine, ccmake will show it’s superiority over the two other methods
ccmake is run with terminal similar to cmake
cd <src_dir>    # move to source code directory
mkdir build     # create build directory
cd build        # move into build directory
ccmake ..       # run ccmake configuration and generation build files

- Press
cto start configuration - Press
tto toggle advance mode - Use keyboard arrow keys to navigation around, with
Enterkey to change the values. - Path autocomplete is available with
Tabkey - After configuration, press
cto re-configure again andgto generate the build files. ccmake will close after generation
To build the binary:
cd ../build # navigate to build directory
make        # compile the binary
install     # install the build files (optional)
CMake on Different Platforms
Unix Makefiles (Unix)
CMake generates a Unix makefile by default when run from the command line in a Unix-like environment. Of course, you can generate makefiles explicitly using the -G option. When generating a makefile, you should also define the CMAKE_BUILD_TYPE variable. Assuming the source folder is the parent:
cmake -G "Unix Makefiles" -DCMAKE_BUILD_TYPE=Debug ..
You should define the CMAKE_BUILD_TYPE variable because makefiles generated by CMake are single-configuration. Unlike a Visual Studio solution, you can’t use the same makefile to build multiple configurations such as Debug and Release. A single makefile is capable of building exactly one build type. By default, the available types are Debug, MinSizeRel, RelWithDebInfo and Release. Watch out – if you forget to define CMAKE_BUILD_TYPE, you’ll probably get an unoptimized build without debug information, which is useless. To change to a different build type, you must re-run CMake and generate a new makefile.
Once the makefile exists, you can actually build your project by running make. By default, make will build every target that was defined by CMakeLists.txt.
- Compile all targets by default:
make - Compile specific target:
make <target> - Parallel compile:
You can also parallelize the build by passing
-j 4(4 refers to 4 cores, you may use a higher number if the machine is available) tomake.make -j <num_of_threads>
The makefile generated by CMake detects header file dependencies automatically, so editing a single header file won’t necessarily rebuild the entire project.
Microsoft Visual Studio (Windows)
We’ll generate a Visual Studio .sln file from the CMake command line. If you have several versions of Visual Studio installed, you’ll want to tell cmake which version to use. Again, assuming that the source folder is the parent:
cmake -G "Visual Studio 14 Win64" ..
The command will generate a Visual Studio .sln file for a 32-bit build. There are no multiplatform .sln files using CMake, so for a 64-bit build, you must specify the 64-bit generator:
cmake -G "Visual Studio 15 2017" ..
cmake -G "Visual Studio 15 2017 Win64" ..

cmake -G "Visual Studio 12" ..
cmake -G "Visual Studio 12 Win64" ..
cmake -G "Visual Studio 12 2013" ..
cmake -G "Visual Studio 12 2013 Win64" ..

cmake -G "Visual Studio 14" ..
cmake -G "Visual Studio 14 Win64" ..
cmake -G "Visual Studio 14 2015" ..
cmake -G "Visual Studio 14 2015 Win64" ..
Double click the resulting .sln file in Visual Studio, go to the Solution Explorer panel, right-click the target you want to run, then choose Set as Startup Project. Build and run as you normally would.

Note that CMake adds two additional targets to the solution: ALL_BUILD and ZERO_CHECK. ZERO_CHECK automatically re-runs CMake when it detects a change to CMakeLists.txt. ALL_BUILD usually builds all other targets, making it somewhat redundant in Visual Studio. If you’re used to setting up your solutions a certain way, it might seem annoying to have these extra targets in your .sln file, but you get used to it. CMake lets you organize targets and source files into folders, but I didn’t demonstrate that in the CMakeDemo sample.

Like any Visual Studio solution, you can change build type at any time from the Solution Configuration drop-down list. The CMakeDemo sample uses CMake’s default set of build types. Release configuration doesn’t produce any debug information yet a much faster runtime than Debug. If your program consist of large size file i/o or complex computation process, Release version will provide a much swift and fast executable than Debug one.
Ninja (Windows/Unix)
CMake also exposes a Ninja generator. Ninja is similar to make, but faster. It generates a build.ninjafile, which is similar to a Makefile. The Ninja generator is also single-configuration. Ninja’s -j option auto detects the number of available CPUs.
Other Compilers (Xcode Qt Creator)
Other CMake Features
- You can perform a build from the command line, regardless of the generator used: cmake –build . –target CMakeDemo –config Debug
- You can create build pipelines that cross-compile for other environments with the help of the CMAKE_TOOLCHAIN_FILE variable.
- You can generate a compile_commands.json file that can be fed to Clang’s LibTooling library.
Recommended IDE for CMake
- Microsoft Visual Studio
- Platform: Windows
- Complier: MVSC
- Qt Creator
- Platform: Windows, Linux, MacOS
- Complier: MSVC, GCC, MinGW
- CLion (Cross Platform)
- Platform: Windows, Linux, MacOS
- Complier: GCC, MinGW
References
- CMake Official Site
- CMake Wiki Page
- CMake Github Page
- Introduction to CMake by Example
- Quick CMake tutorial with CLion