jackyko1991.github.io Biomedical Image Computation 101
HPC Cluster Setup Part 2 - Hardware, NFS and NIS Setup

To setup a HPC cluster, you should always get the hardware ready first.
Step 0: Hardware Setup
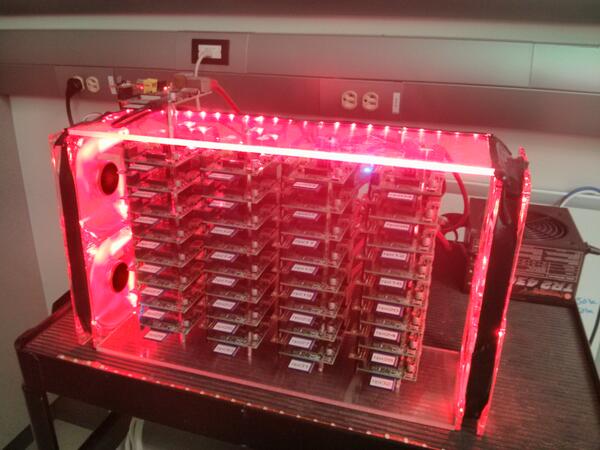
Here we demonstrate the setup of a small cluster unit with 1 head node and 3 child nodes. For simplicity we will the CPU architecture is assume to be x64, though similar setup also works on ARM nodes like Raspberry Pi.
Parts list
- x64 architecture computers with Nvidia GPUs x 4 (1 head + 2 child nodes, recommended identical devices, GPUs should support CUDA 8.0 or above)
- Network router with minimum 4 ports x 1 (expandable via switches, 1000Gbps recommended)
This setup is scalable to as many nodes as you have, you may also have a separate network attached storage to the system for large data I/O. Here we will use the head node to act as the storage node.
Step 1: Install OS
It would be far easier to have all cluster nodes in same OS. To reduce graphical computation resources, I highly recommend Ubuntu Server for child nodes. If you are comfortable with SSH communications and CLI Linux environment, install Ubuntu Server for head node as well, or else you may choose any Ubuntu Desktops with same distribution number as the child nodes. This is to maintain the same dependency environment across whole cluster and software can be installed simultaneously across all nodes.
Choice of OS
- GUI head node
- Ubuntu Desktop 18.04 LTS (install in head node only)
- Ubuntu Server 18.04 LTS (install in all child nodes)
- CLI head node
- Ubuntu Server 18.04 LTS (install in all nodes)
Both GUI and CLI works the same afterward…as long as all Slurm setups are accomplished under CLI environment…Linux newbies may feel more comfortable with GUI version as long as the file editing can be done without knowledge of CLI editors like Nano or Vim. Under GUI Linux you can call up the CLI terminal with Ctrl + Alt + T.
Step 2: Network Setup

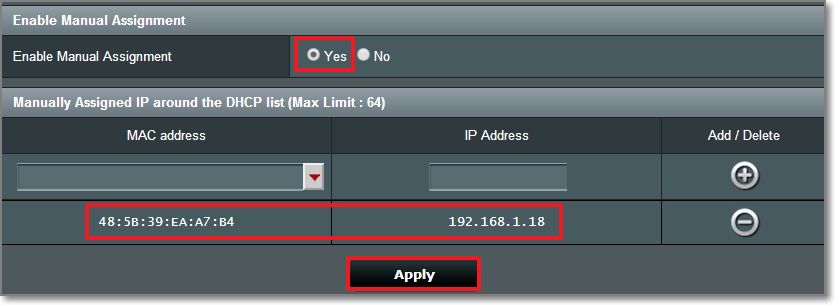
It is essential to keep all nodes IPs constant over time to guarantee stable communication between nodes. In most modern day routers users may login to the admin interface to bind device IP according their MAC addresses under DHCP.
Step 3: Node Setup
Slurm expects hosts to be named with a specific pattern:
<nodename><nodenumber>. When choosing the hostname for the nodes, it would be convenient to name them systemically in order. (e.g.node01,node02,node03,node04,…)
Hostname
Now we may setup the hostname:
sudo hostname node01       	# whatever name you chose
sudo vim /etc/hostname    	# change the hostname here too
sudo vim /etc/hosts       	# change the hostname to "node01"
System Time
Node communication requires accurate time synchronizations. The ntpdate package will periodically synchronize OS time in the background.
sudo apt-get install ntpdate -y
Reboot
sudo reboot
Repeat the procedure for all nodes but each of them with a different node number.
Shared Storage

Storage node is one the three key components of the HPC cluster. In order for the softwares/ data be able to run on any of the nodes in the cluster, each node should be able access to the same files. In a large scale cluster there is often an individual node for data storage purposes.
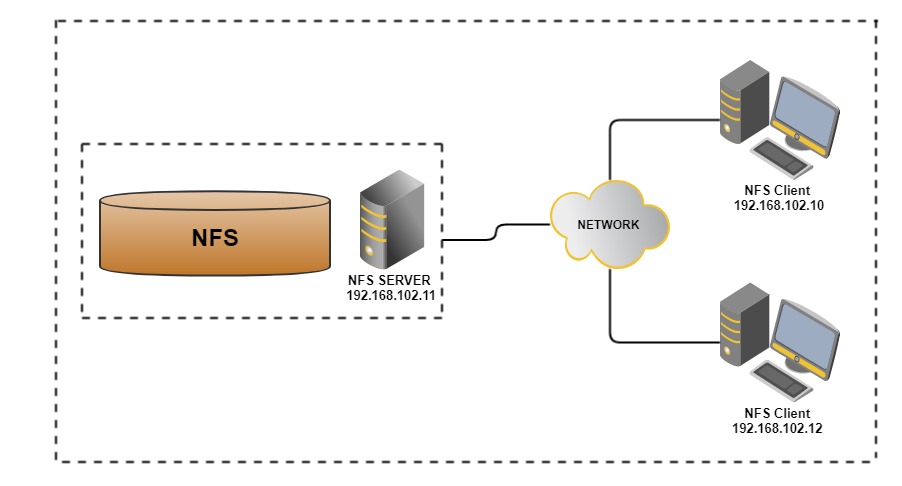
In this mini setup we will use the head node to act as the storage node. A specific folder will be exported as a network file system (NFS) and mounted among all nodes. If you have a separate network attached storage (NAS), you may mount that on all nodes as NFS.
Create and Export NFS directory
- Create mount directory in head node
sudo mkdir /clusterfs #create NFS directory at /clusterfs sudo chown nobody.nogroup -R /clusterfs #/clusterfs now owned by pseduo user sudo chmod 777 -R /clusterfs #R/W permission for all users to the NFS directory - Export the NFS directory
You need to host a NFS server in the head node.
- Install NFS server
sudo apt install nfs-kernel-server -y - Export the NFS directory
Add following lines to
/etc/exports:/clusterfs <ip-address>/24(rw,sync,no_root_squash,no_subtree_check)where
<ip-address>is the IP of the head node. You may check with router interface or viaifconfig. This permission setting allows any clients to mount the shared directory. e.g. if the LAN address is192.168.0.123, you will have/clusterfs 192.168.0.123/24(rw,sync,no_root_squash,no_subtree_check)
rwprovides client R/W accesssyncforces changes to be written on each transactionno_root_squashenables the root users of the clients to write files as root permissionsno_subtree_checkprevents errors caused by a file being changed while another system is using it.
- Install NFS server
- Update the NFS kernel server
sudo exportfs -a
Mount the NFS directory
Now we have exported the NFS directory from head node to the network. On child nodes you need mount in order to work like a single directory. Repeat the following procedures for all child nodes
- Install NFS client
sudo apt install nfs-common -y - Create mount directory in child nodes
Guess what, this is exactly the same you have done for the head node
sudo mkdir /clusterfs #create NFS directory at /clusterfs sudo chown nobody.nogroup -R /clusterfs #/clusterfs now owned by pseduo user sudo chmod 777 -R /clusterfs #R/W permission for all users to the NFS directory - Auto mounting
We want the NFS directory automatically mounted on the child nodes when they boot.
- Edit
/etc/fstabby adding:
<head-node-ip>:/clusterfs /clusterfs nfs defaults 0 0This line refers to mounting shared directory at head node to the “local” folder
/clusterfsas NFS.- Actually mount the drive:
sudo mount -aOnce you create a file in any node’s/clusterfsit will be RWable in all other nodes.
- Edit
NIS System
You will need a NIS server in order to synchronize all user’s account among the cluster network.
Configuring NIS Server
- Install NIS System on head node
sudo apt-get install nis - Configure this node as master
- Edit the NIS configuration file
sudo vim /etc/default/nisChange the line
NISSERVER=master - Select proper access IPs to the NIS
sudo vim /etc/ypserv.securenetsChange the line
# This line gives access to everybody. PLEASE ADJUST! # comment out # 0.0.0.0 0.0.0.0 # add to the end: IP range you allow to access 255.255.255.0 10.0.0.0 - Modify the Makefile
sudo vim /var/yp/MakefileChange the lines
 # line 52: change
 MERGE_PASSWD=true
 # line 56: change
 MERGE_GROUP=true
sudo vim /etc/hostsAdd the IP address for NIS
127.0.0.1 localhost # add own IP address for NIS 10.0.0.30 dlp.srv.world dlp - Update the NIS database
/usr/lib/yp/ypinit -mAt this point, we have to construct a list of the hosts which will run NIS servers. dlp.srv.world is in the list of NIS server hosts. Please continue to add the names for the other hosts, one per line. When you are done with the list, type a <control D>. next host to add: dlp.srv.world next host to add: # Ctrl + D キー The current list of NIS servers looks like this: dlp.srv.world Is this correct? [y/n: y] y We need a few minutes to build the databases... Building /var/yp/srv.world/ypservers... Running /var/yp/Makefile... make[1]: Entering directory '/var/yp/srv.world' Updating passwd.byname... Updating passwd.byuid... Updating group.byname... Updating group.bygid... Updating hosts.byname... Updating hosts.byaddr... Updating rpc.byname... Updating rpc.bynumber... Updating services.byname... Updating services.byservicename... Updating netid.byname... Updating protocols.bynumber... Updating protocols.byname... Updating netgroup... Updating netgroup.byhost... Updating netgroup.byuser... Updating shadow.byname... Ignored -> merged with passwd make[1]: Leaving directory '/var/yp/srv.world' dlp.srv.world has been set up as a NIS master server. Now you can run ypinit -s dlp.srv.world on all slave server. - Restart the NIS service
sudo systemctl restart nis
- Edit the NIS configuration file
- If you have added users in local servers, apply them to NIS database as well
 cd /var/yp
 make
Configuring NIS Client
- Install NIS System on head node
sudo apt-get install nis - Configure this node as client
- Edit the NIS configuration file
sudo vim /etc/yp.confChange the line
# ypserver ypserver.network.com # add to the end: [domain name] [server] [NIS server's hostname] domain srv.world server dlp.srv.world - Edit NS Switch Config
sudo vim /etc/nsswitch.confChange the lines
# line 7: add like follows passwd: compat systemd nis group: compat systemd nis shadow: compat nis gshadow: files hosts: files dns nis - Set the PAM rule for SSH if you wan to create /home/user/ directory automatically
sudo vim /etc/pam.d/common-sessionAdd the lines
# add to the end session optional pam_mkhomedir.so skel=/etc/skel umask=077 - Restart the NIS
sudo systemctl restart rpcbind nis -
Try to logout and login again and see the NIS works
- Change the NIS password if you want to
yppasswdChanging NIS account information for bionic on dlp.srv.world. Please enter old password: Changing NIS password for bionic on dlp.srv.world. Please enter new password: Please retype new password: The NIS password has been changed on dlp.srv.world.
- Edit the NIS configuration file
The hardware part is done. Coming next we will start to install the job scheduler Slurm.