jackyko1991.github.io Biomedical Image Computation 101
HPC Cluster Setup Part 3 - Slurm Installation

Slurm (Simple Linux Utility for Resource Management) is a free and open source job scheduler for Linux and Unix kernel supercomputer and clusters. The software is currently used as the workload manager on about 60% of the Top 500 supercomputers.
You may get deeper look at Slurm through the official documentations and tutorials. Here we only provide a minimal tutorial on GPU cluster setup.
Computation jobs in HPC clusters are run in sequential orders with a specialized scheduling scheme. A scheduler receive user job submissions and arrange job executions in accordance to the priority level. When requested computational resources are available the submitted jobs will be processed in order to fully utilize computation hardwares.
Slurm Architecture

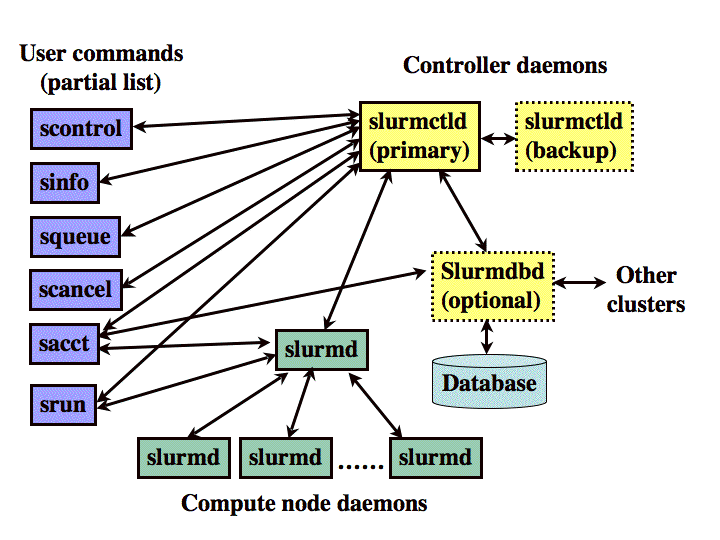
Slurm is run through Linux daemons for different services:
- slurmctld (Slurm controller daemon)
- To monitor resources and work
- Can setup backup controller at multiple nodes for high availability cluster
- Works at head node
- slurmd (Slurm worker daemon)
- Works at compute nodes
- Waits and executes works assigned by slurmctld and return computation status
- slurmdbd (Slurm database daemon, optional)
- Record accounting information into database
- Necessary when users need to set resources limits
Slurm commands will be explained after the installation.
Slurm Installation
Head Node Configuration
- Login to the head node
- To make the resolution of worker nodes in the cluster clearer, we may give local hostnames in respect to their IP addresses:
sudo vim /etc/hostsAdd the associate lines:
<ip addr of node02> node02 <ip addr of node03> node03 - Install the Slurm controller package:
sudo apt-get install slurm-wlm -y - Copy and edit the default Slurm configuration file:
cd /etc/slurm-llnl cp /usr/share/doc/slurm-client/examples/slurm.conf.simple.gz . gzip -d slurm.conf.simple.gz sudo mv slurm.conf.simple slurm.conf sudo vim slurm.conf - Set the controller node info, edit the
slurm.conffile:SlurmctldHost=node01(<ip addr of node01>) # e.g.: node01(192.168.1.14) - Customize the scheduler algorithm
HPC cluster jobs can be allocated in different ways. Here we will use the basic “consumable resources” approach. This refers to that each node has a list of consumable resources, including CPU cores, memory and GPUs. The request will be allocated according to default settings unless user specifications. You may edit the
SelectTypefield as following:SelectType=select/cons_res SelectTypeParameters=CR_Core_Memory,CR_CORE_DEFAULT_DIST_BLOCK,CR_ONE_TASK_PER_CORE - Set the cluster name
You may give an arbitrary name to your new cluster at
ClusterNameunderLOGGING AND ACCOUNTINGsection:ClusterName=mycluster - Set the worker nodes
We need to tell Slurm which computers in the network is used as computational nodes. Near the end of the file, the default file has an example entry for a single worker node. Change it to the one satisfy our setup:
 # here the head node (node01) also act as a worker node
 NodeName=node01 NodeAddr=<ip addr node01> CPUs=40 Sockets=2 CoresPerSocket=20 ThreadsPerCore=1 RealMemory=515896 State=UNKNOWN
 NodeName=node02 NodeAddr=<ip addr node02> CPUs=40 Sockets=2 CoresPerSocket=20 ThreadsPerCore=1 RealMemory=515896 State=UNKNOWN
 NodeName=node03 NodeAddr=<ip addr node03> CPUs=40 Sockets=2 CoresPerSocket=20 ThreadsPerCore=1 RealMemory=515896 State=UNKNOWN
Here we have identical nodes with dual CPU sockets. Each CPU are running with 20 cores without hyper-threading. RAM size is 515896MB.
Kindly reminder: You may reserve a portion of computation resources in head node to prevent worker tasks jamming Slurm controller services, i.e. set CPUs to 36 and reduce the RAM size in the ‘slurm.conf’ file
-
Create a partition

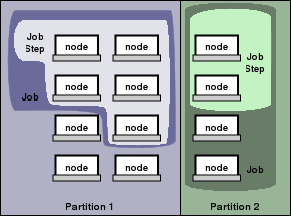
Partitions in Slurm group worker nodes into logical sets. Jobs and resources can be assigned by user to specific partitions with each partition running with different priority rules. This encourages different hardware owners to participate in a single cluster by sharing peripheral devices including controller and storage services.
At the last line of
slurm.conf, define the partition:PartitionName=partition1 Nodes=node[01-03] Default=YES MaxTime=INFINITE State=UPIf you want to set a maximum job running time under partition level, you may set
MaxTime=<min, hr:min:00, days-hr:min:00, or days-hr>, e.g.MaxTime=60for 60mins andMaxTime=2-12:00:00for 2 days 12 hours run. - Configure cgroups:
Slurm supports Linux cgroups kernel isolation, which will restrict the access to system resources. To tell Slurm which resources are allowed access:
sudo vim /etc/slurm-llnl.cgroup.confPaste the following:
CgroupMountpoint="/sys/fs/cgroup"
CgroupAutomount=yes
CgroupReleaseAgentDir="/etc/slurm-llnl/cgroup"
AllowedDevicesFile="/etc/slurm-llnl/cgroup_allowed_devices_file.conf"
ConstrainCores=yes
TaskAffinity=no
ConstrainRAMSpace=yes
ConstrainSwapSpace=no
ConstrainDevices=yes
AllowedRamSpace=100
AllowedSwapSpace=0
MaxRAMPercent=100
MaxSwapPercent=100
MinRAMSpace=30
Then you need to whitelist the system devices by creating the file
/etc/slurm-llnl/cgroup_allowed_devices_file.conf:/dev/null /dev/urandom /dev/zero /dev/sda* /dev/cpu/*/* /dev/pts/* /clusterfs*To enable memory cgroups for restricting memory allocation by jobs you need to modify the Linux kernel upon bootup:
sudo vim /etc/default/grubChnage the GRUB commandline to:
GRUB_CMDLINE_LINUX="cgroup_enable=memory swapaccount=1"Update GRUB and reboot:
sudo update-grub sudo reboot - Copy the configuration files to NFS
To apply settings to all nodes across the cluster, copy the slurm configuration files and Munge keys to the shared drive:
sudo cp slurm.conf cgroup.conf cgroup_allowed_devices_file.conf /clusterfs
sudo cp /etc/munge/munge.key /clusterfs
Munge acts like key-based SSH for Slurm to communicate among nodes. It generates a private key to be used on all nodes while inter-node signals are encrypted with timestamps. Receiving signals will be decrypted with the identical key. Therefore both time synchronization and
munge.keyare important for Slurm to work properly. - Start Slurm services
Restart Munge:
sudo systemctl enable munge
sudo systemctl start munge
Restart Slurm worker daemon:
sudo systemctl enable slurmd
sudo systemctl start slurmd
Restart Slurm controller daemon:
sudo systemctl enable slurmctld
sudo systemctl start slurmctld
Worker node configuration
Repeat this part for all worker nodes except for head node
- Install Slurm client
sudo apt-get install slurmd slurm-client -y - Update
/etc/hoststo resolve other nodes on the worker node, for example onnode02:<ip addr> node01 <ip addr> node03 - Copy the configuration files from shared drives
sudo cp /clusterfs/munge.key /etc/munge/munge.key sudo cp /clusterfs/slurm.conf /etc/slurm-llnl/slurm.conf sudo cp /clusterfs/cgroup* /etc/slurm-llnl - Start Munge
sudo systemctl enable munge sudo systemctl start munge - Test Munge
ssh <username>@node01 munge -n | unmungeYou will receive result similar to the following:
 STATUS:           Success (0)
 ENCODE_HOST:      node01
 ENCODE_TIME:      2018-11-15 15:48:56 -0600 (1542318536)
 DECODE_TIME:      2018-11-15 15:48:56 -0600 (1542318536)
 TTL:              300
 CIPHER:           aes128 (4)
 MAC:              sha1 (3)
 ZIP:              none (0)
 UID:              pi
 GID:              pi
 LENGTH:           0
Check
/etc/munge/munge.keyare the same across nodes if you get error. - Start Slurm worker daemon
 sudo systemctl enable slurmd
 sudo systemctl start slurmd
Check Slurm Work properly
Login
References
Building a Raspberry Pi Cluster Slurm documentation Ubuntu Slurm
Published on September 20th, 2019 by Jacky Ko